
Secrets from Digital Artists – Logos
When working with logos, you always want to make sure you’re working with a vector file. You might ask, “Well, how do I check to make sure my file is vector?” Open your file in any viewing program and zoom in as close as you can get to the edges. If they appear pixelated, you […]
11/10/2016
Categories: High School Sports

When working with logos, you always want to make sure you’re working with a vector file. You might ask, “Well, how do I check to make sure my file is vector?” Open your file in any viewing program and zoom in as close as you can get to the edges. If they appear pixelated, you have a raster file. If the edges are smooth, you have a vector file!
VECTOR FILES VS. RASTER FILES

REMOVING THE WHITE SPACE
Now that you have the correct file for your logo, let’s look into removing the white space around the logo so it doesn’t show on the colored background you’ve chosen.
FIGURE 1-2
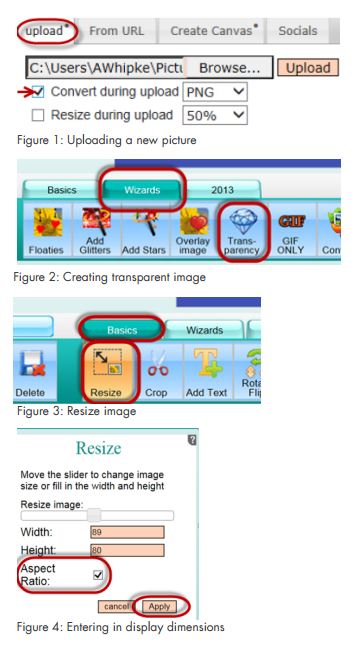
- Go to http://www.online-image-editor.com/
- Click on Browse and go the location of your logo, select and open.
- Place a check mark in front of Convert during upload (PNG).
- Make sure PNG is selected in the drop-down and select Upload.
- Do NOT choose to resize
now, you can do that later. - Click on the Wi
![image_editor]() zards tab and then click Transparency in the toolbar.
zards tab and then click Transparency in the toolbar. - Left click on each area you’d like transparent. All areas you want transparent should have a gray checkerboard in place of the original image.
 zards
zardsFIGURE 3
- Click on the Basics tab and then Resize in the toolbar.
- In the left column, you will see the current size of the graphic. Resize to fit your display dimensions.
FIGURE 4
- Change the height to the height of your display and the same for the width.
- Leave Aspect Ratio with a check mark and click Apply.
- Click the Save icon.
- Click on Save Image Local.
And voila – you now have your finished logo to place in any content slides going onto your display without the irritating block of white surrounding it. Share this with your students and drop a comment below with an example of your students’ work!