
Back to Basics: Downloading the Daktronics Media Kit
Greetings and salutations, my fellow Venus 1500 V4 users! Today we are going to have a very informative discussion about the Daktronics Media Kit. You see, as many of you already know, Daktronics provides a FREE media kit along with the Venus 1500 V4 software. We highly recommend using the Media Kit to help you […]
Daktronics Commercial Software Training on 2/22/2017
Categories: Venus 1500 Training
Greetings and salutations, my fellow Venus 1500 V4 users! Today we are going to have a very informative discussion about the Daktronics Media Kit. You see, as many of you already know, Daktronics provides a FREE media kit along with the Venus 1500 V4 software.
We highly recommend using the Media Kit to help you create the best possible content. We have posted about the media kit in the past and provided you with many ideas and suggestions to use it. If you haven’t already read those posts, please be sure to do so at your earliest convenience!
Today, however, we are going back to the basics, as the title of this blog implies, to show you when to download the Media Kit and how to download the Media Kit. And since we already covered the WHY (see previous paragraph!), we may throw in a few extra goodies at the end, just for good measure!
When do I download the Media Kit?
You should download the Media Kit right away during your initial installation of the Venus 1500 V4 software. In fact, after you have configured your display(s), you will be prompted and asked if you want to download the Media Kit now.
If you chose “No,” don’t worry! You can download the Media Kit at a later date. In fact, if you keep reading, we’ll show you how to find it.
Finally, download the Media Kit if you are going to switch computers. Whether your computer crashes and you replace it, or you just upgraded to a newer computer, the media kit will have to be reinstalled.
So to clarify, if you ever move the Venus 1500 V4 software to a different computer, even if you transfer the database, you will still have to download the Media Kit on that computer.
How do I download the Media Kit during the installation process?
For those of you who are going to download the Media Kit right away during the software installation process, please follow the instructions below.
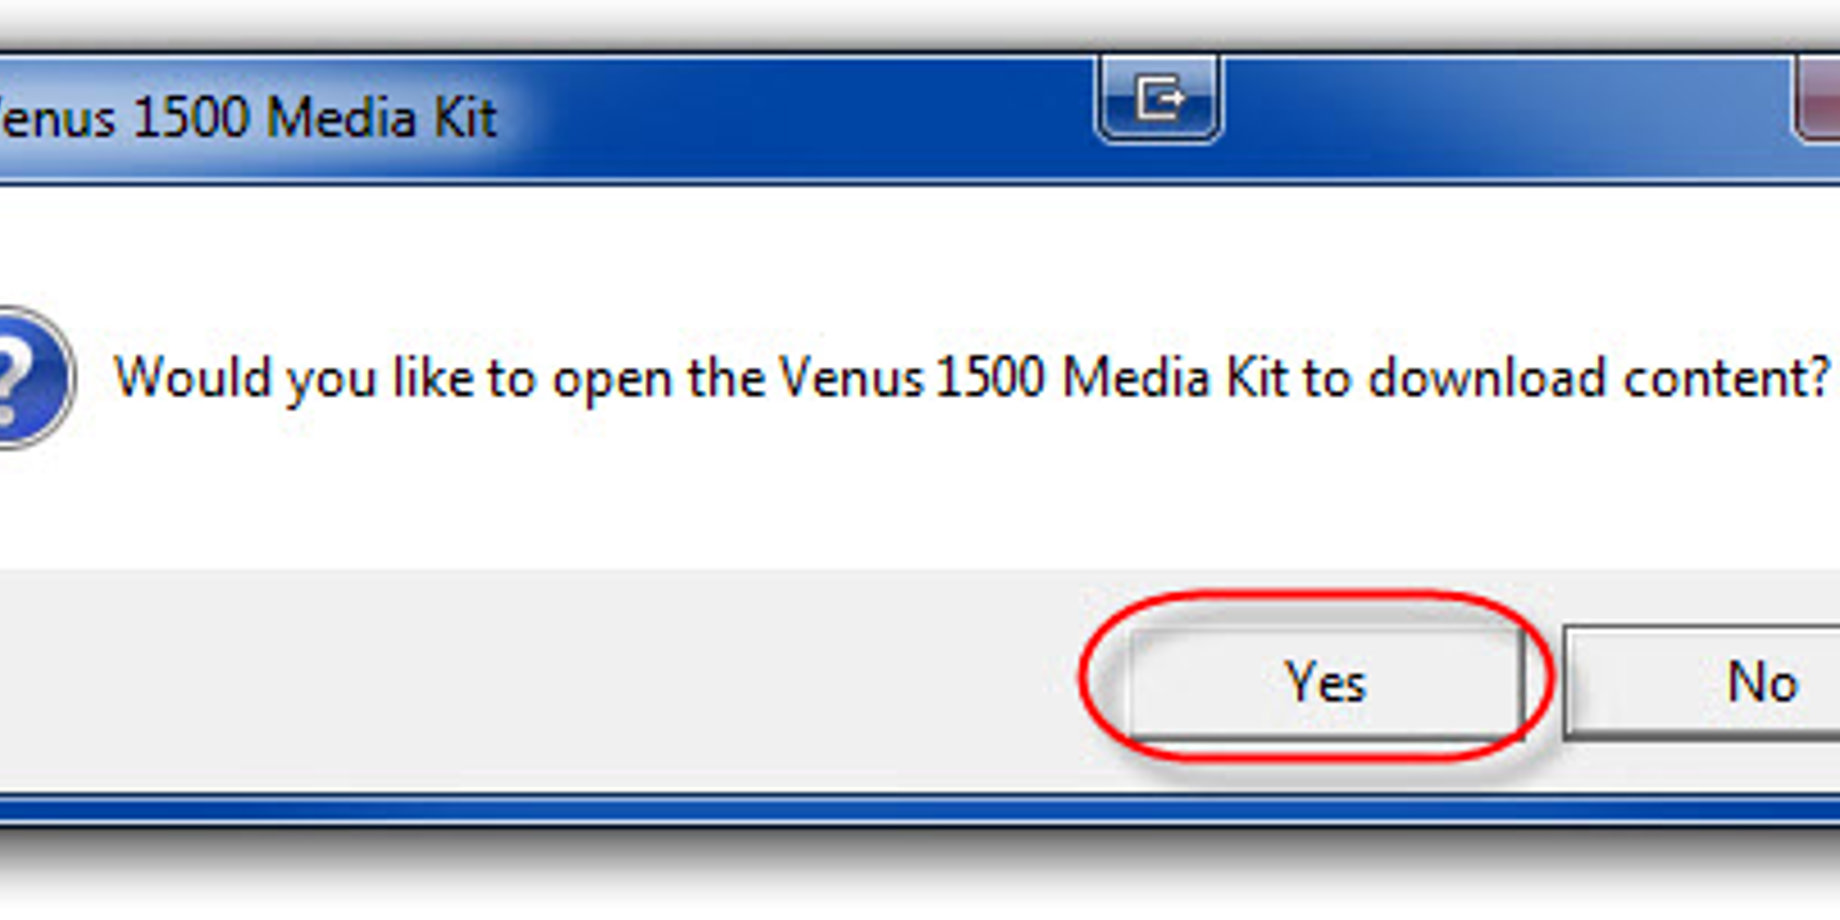
After you have created and configured your display(s), Venus 1500 V4 will prompt you and ask you if want to download the Media Kit now. First, choose and click Yes.

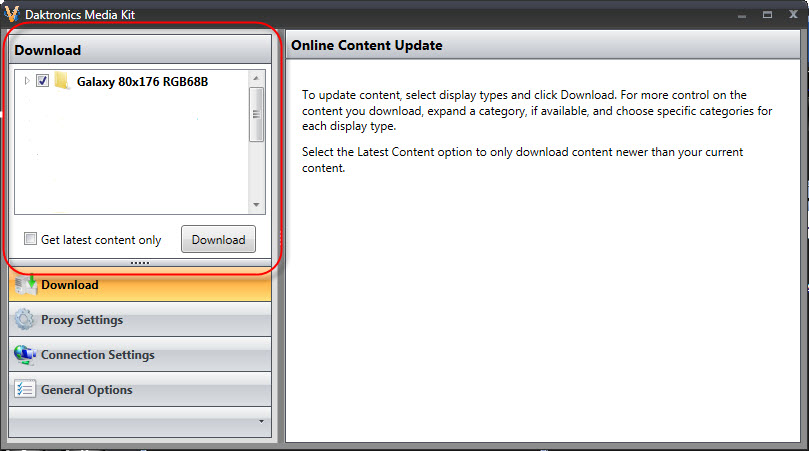
Then you will see a Daktronics Media Kit window open. Then, put check marks next to your display listed in the upper left quadrant and next to Get Latest Content Only. This ensures you don’t end up with duplicates, just in case you downloaded the Media Kit already and forgot. Finally, click the Download button and watch the hundreds of files from the free Media Kit download.
You can minimize this window and work on other things as this process may take a few minutes.
Trainer Tip: You can find step-by-step instructions for downloading the media kit by visiting the Venus 1500 Learning Center. The Venus 1500 Learning Center is a great place to go for self-guided trainings about the Venus 1500 V4 software. It’s also a nice place to visit if you need a quick refresher course about operating Venus 1500 V4. It’s chock-full of videos you can watch and guides that will give you step-by-step directions how to do all sorts of things in your software! Check it out!
You didn’t download the Media Kit during the installation process?
For those of you who are procrastinators (like me!) and chose not to download the Media Kit right away, please follow the instructions below.
Click on the Start Menu on your computer and choose All Programs. Next, find and click on the Daktronics folder. Finally, click on the Venus 1500 V4 folder to expand it. Then, click on Venus 1500 Media Kit. This will open the Daktronics Media Kit window.
Now you will want to put check marks next to your display listed in the upper left quadrant and next to Get Latest Content Only. This ensures you don’t end up with duplicates, just in case you downloaded the Media Kit already and forgot. Finally, click the Download button and watch the hundreds of files from the free Media Kit download.
You can minimize this window and work on other things as this process may take a few minutes.
Trainer Tip: If you are using Windows 10, instead of going to your Start Menu, just search your computer for Venus 1500, and it will find Venus 1500 Media Kit as a result. Then you can follow the above instructions to complete the download.
Is the FTP site blocked?
The Media Kit is downloaded from an FTP site. So, you will need to access FTP sites to complete the download. Sometimes IT Departments have firewalls or other security measures in place that will block FTP sites.
If this is the case for you, then all you have to do is send an email request to our Creative Services team here at Daktronics, and they will email the Media Kit to you. Please click on the below Knowledge Base article for instructions.
16-pixel high or smaller displays
If your display size is 16 high or smaller, it is not a supported size for Media Kit or content packages. Unfortunately, we are unable to support small display sizes with Media Kit and package content. This is because the small pixel count affects quality images, textures and logos.
We recommend text-only messages built in Content Studio to best optimize your display technology. Typically, we offer the full Media Kit for displays that are 32-pixel high or more. However, we may be able to provide limited media kits for 24-pixel high displays.
Trainer Tip: For those of you with smaller displays, we recommend utilizing the Character Map in Content Studio to add some extra flare to your messages! We have posted several blogs in the past showing you the capabilities of the Character Map and how to create eye-catching content on your displays!
- Small Display Help – Using the Character map to Add Interest
- Small Display Help 2 – Scrolling a Graphic
- Small Display Help 3 – Getting the Most Out of Your Display
- I didn’t know I could do that! Part One: Scrolling Characters
Monochrome displays
For those of you with monochrome (amber or red) displays, don’t worry. We haven’t forgotten about you! The Media Kit will still look great on your display(s); it will just be in amber or red shades. However, if you are still worried or have concerns about using it, then we’ve got you covered! Be sure to check out our recent blog post, “Monochome Miniguide” which will help you create quality content on your monochrome display, large or small, amber or red.
Extra Goodies!
If you’re still hanging around, boy, do we have some goodies for you! Our Creative Services team here at Daktronics worked very hard to create some amazing new backgrounds for your displays! We are happy to announce that 12 brand-new content packages are now available for download. The best part is, they’re FREE!
Click here to download the BRAND NEW Background Animations & Stills!
We aren’t finished just yet! That’s right, I have even more good news for you!
Want those new animations and stills to show up in the Media Library in Content Studio so you don’t have to browse your computer for them? Here are the directions to make that happen!
- Download the new Background Animations & Stills to your desktop. If the folder is zipped, then unzip it by right-clicking on it and choosing Extract All.
- Now open the unzipped folder and click to open the folders inside until you can see thumbnails of all your new animations. Leave that window open.
- Click on your Start Menu.
- Go to Computer or My Computer.
- Go into your (C:) drive.
- Click on the Users folder.
- Click on the Public folder.
- Click on the Public Documents folder.
- Click on My Daktronics.
- Click on your display aspect ratio folder. It will look like 1×2 or 2×3 or something similar.
- Click on the display height folder. It will be a single number like 80 (that represents your display height).
- Click on the Animations folder to open it up and you will see all of your media kit content. Leave this window open.
- Now all you have to do is highlight, click and drag all of your new animations from Step 2 into the animations folder from Step 12.
- Repeat the same steps for the Stills folders.
- Now all of your new content will automatically appear in the Media Library in Content Studio. If you want to search by category, you will find any new content under Miscellaneous.
We also have a Knowledge Base article that provides instructions for getting the Media Kit that was sent to you via email or from a Flash Drive to show up in Content Studio that you can refer to as well.
That’s all we have for this week, folks! We hope you learned something that will help you with your display!
If you like reading our blog, be sure to click on the orange “Receive Email Updates” button on the right side of your screen to subscribe.
Thanks for reading!