
How do I put my Venus 1500 software on a new computer?
If you are using Venus 1500 to control your Daktronics display and you need to switch to a new computer, this article is for you!
Daktronics Commercial Software Training on 2/1/2019
Categories: Venus 1500 Training
Today we will walk you through installing Venus 1500 V4 on a new computer, as well as transferring your Venus 1500 database from your old computer.
Here’s what you will need:
- Your OLD COMPUTER (the computer currently running the display)
- A flash drive, shared network folder, or cloud storage to transfer the database file
- Your NEW COMPUTER
- Internet Access
Why transfer my database?
Transferring your database will bring all your sign configuration settings to your new computer, as well as all your created content, your schedule (including playlists), and other saved settings, such as restrictions and user security. Basically, if you do not transfer your database, then you will have to reconnect, re-create and reschedule all your content! And that’s a lot more work.
Step 1 – Update Venus 1500 on the existing computer
First, you will want to be sure the OLD computer is running the latest version of Venus 1500. You can update to the latest version FREE by clicking here: Venus 1500 download page
- Scroll down and click the orange UPDATE button
Step 2 – Create a Database File
- On the OLD computer, navigate to this folder (see image below).
C:\Program Files (x86)\Daktronics\Nucleus Server\Database Utility

*Note: the above image represents the location of the Database Utility on a Windows 10 64-bit operating system. For older operating systems, the Utility may be located here:
32 Bit System: C:\Program Files\Daktronics\Nucleus Server\Database Utility
64 Bit System: C:\Program Files (x86)\Daktronics\Nucleus Server\Database Utility
Click this link for additional information on locating and using the Nucleus Server Database Utility
- Double Click the Venus 1500 Database Utility; you will then see this prompt:
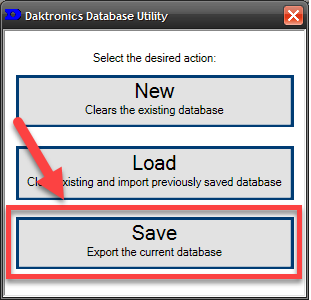
- Click Save
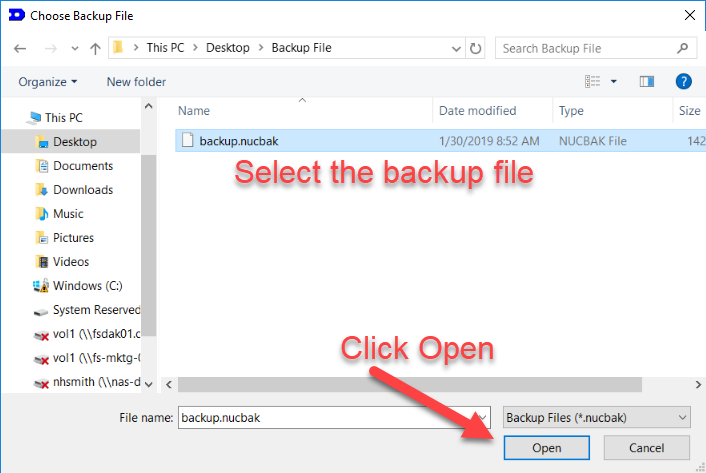
- Save the backup file – browse to a desired location to save or backup the database such as Shared/Network Drive, Flash Drive and/or desktop, click Save. (The file will look like this: Backup.nucbak).
- You will need to transfer and LOAD this file on the NEW computer. We recommend a flash drive, shared network folder, or file storage service (i.e. Google Drive/Dropbox/OneDrive) to complete this. The file will be too large to send via email.
Step 3 – Install Venus 1500 on the NEW computer
- Go to daktronics.com/venus1500
- Click the Orange Download Venus 1500 button.
- Under the corresponding Windows operating system, click Download.
- Click Save As and save the file to your computer.
- We recommend saving to the Desktop or Windows Downloads folder.
- After download is completed, run the setup.exe file.
- Follow the installation wizard steps and click Finish at the end of the wizard.
- Click Yes if prompted to restart your computer.
- IMPORTANT: Set Schedule tab in Venus 1500 to previous mode used (Continuous Mode or Scheduled Mode). For instruction, refer to How do I switch between Continuous Mode and Scheduled Mode in Venus 1500 V4?, DD1996807.
- Note: At this time you DO NOT need to configure your display
- Note: Once you install the latest version of Venus 1500, you will not need to re-license (register) your install.
Step 4 – LOAD the Database file on the NEW computer
- Follow the same instructions for step 2 (navigate to the Database Utility), but this time select LOAD

 “Save the existing database before proceeding with the Load Setup?” – Choose No
 “Loading setup will overwrite your existing data, Continue?” – Choose Yes
- Select the backup file. (This is the file you brought over from the old computer via a flash drive or shared drive.)
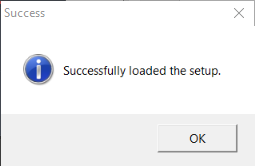
You will see a blue circle of LEDs spinning while the database is loading, then it will say Successfully loaded the setup.
You did it!
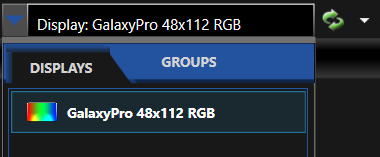
You have successfully transferred your database, so all your sign configuration settings, as well as all your created content, your schedule (including playlists), and other saved settings have been loaded on your NEW computer. If you open Venus 1500 V4, you will see all your content and playlists are loaded. You will want to make sure your display is selected by clicking the blue drop down arrow (see image below).
There is one exception to this process – the Venus 1500 Media Kit, which will not appear in your Content Studio Media Library until you have re-download it. Please follow these instructions to download the media kit:
Video Guide – Venus 1500 Media Kit Download
OR
How do I download the Venus 1500 V4 Media Kit? (knowledge base article)
Lost all your Media Files?
If for any reason you cannot get access to your hard drive because your computer is completely fried (or lost), you can retrieve all the running presentations from your display into the newly downloaded Venus 1500 V4 on your new computer by following How do I retrieve my running/stored presentations and playlists from a display in Venus 1500 V4?, DD1992502. This way, you won’t have to completely start over from scratch.
Thanks for reading!
For additional information about transferring Venus 1500 V4 to a new computer, please refer to the following related Knowledge Base Article:
How do I reinstall or setup the Venus 1500 V4 software after a computer crash, hard drive reimage, or change of computers?