Display Your Seniors
Recognize your graduates in even more ways this year!
Daktronics Control Panel on 4/27/2021
Categories: High School Sports, Pro Sports and Colleges, Venus Control Suite Training

For many of you, graduation day for spring graduates is quickly approaching. Here are a couple of ideas for using Venus Control Suite and Content Studio to create content to play on your display during graduation ceremonies.
SCROLLING TEXT OF GRADUATE NAMES
For traditional scrolling text going left to right, view this Knowledge Base article for steps on how to achieve it.
Did you know you can also use the Scrolling Text feature in Content Studio to create messages that scroll up or down just like movie credits? Just type in the names of your graduating students and run them while they are walking across the stage to receive their diplomas! Simply follow these instructions.
- In Content Studio, click on the Insert Tab.
- Click on Scrolling Text.
- Type in your graduates’ names one by one in a top-down column by hitting the Enter key on your keyboard after each name. You can even click enter twice (or more) to add additional space between names.
- Choose your formatting options like font type, size, color, outline, etc. You will have all of the same formatting options you see in the Home tab available to you within the Scrolling Text Import window.
- Click Next.
![Scrolling names]()
- Choose your Scrolling Direction. In this case, you will choose either Up or Down, depending on which way you want their names to scroll. A yellow arrow will appear letting you know which direction the names will scroll.
- Choose your Text Offset. Most likely you will choose to have the names centered, but you can also align to the left or right of your display if you desire. Make sure to put a check mark next to ‘Scroll text completely off’ to avoid any names getting cut off.
- Click Next.
![Scrolling offset]()
- Choose your Scrolling Speed. Typically, most people choose Normal or Fast speed, but we recommend that you watch the message scroll on the actual display in order to decide which speed you prefer and think will work the best.
- Click Import.
- Preview your presentation by using the Preview buttons, and when you are satisfied with your results, stop the preview and Save your presentation.
![Save scrolling]()


PAGING OF GRADUATE NAMES
Paging is most often used for announcements or daily specials. When you think of paging, just imagine creating layouts within layouts. By doing so, you can do some really cool things for your graduates!
For example, if you have several students graduating with honors, you could put each of their pictures in a different page and have a static message next to it saying “Graduating with Honors.” If you want to create a paging element like this, then follow these steps.
- In Content Studio, click on the Insert Tab.
- Click on Paging.
- Hover your mouse over the layout and click and drag to cover the area you want your page to cover.
- When you let go, your page will have a gold border and you will see a Pages tab appear on top of Content Studio. Click Add for additional pages.
![Add pages]()
- Within the Timeline, click on the silver arrow on the left side of your paging element bar and click on the page you want to put a picture in.
- Click on the Insert Tab and click Picture.
- Browse to the picture of your student, double-click it, and Import it into the page by clicking on the Import button.
- Repeat steps 5-7 for all additional students.
- Add a text box to your layout by clicking on Text Box in the Insert Tab and then clicking and dragging to cover the area you want your text box to cover. Do not overlap your text box with the paging element.
- When you let go, your text box will have a gold border around it and you can type your message inside. When finished, click outside of the text box to see a green border appear. As long as you see that green border, any formatting changes you make will only apply to what is inside the text box.
- Preview your presentation by using the Preview buttons. When you are satisfied with your results, stop the preview and Save your presentation.
![Paging]()


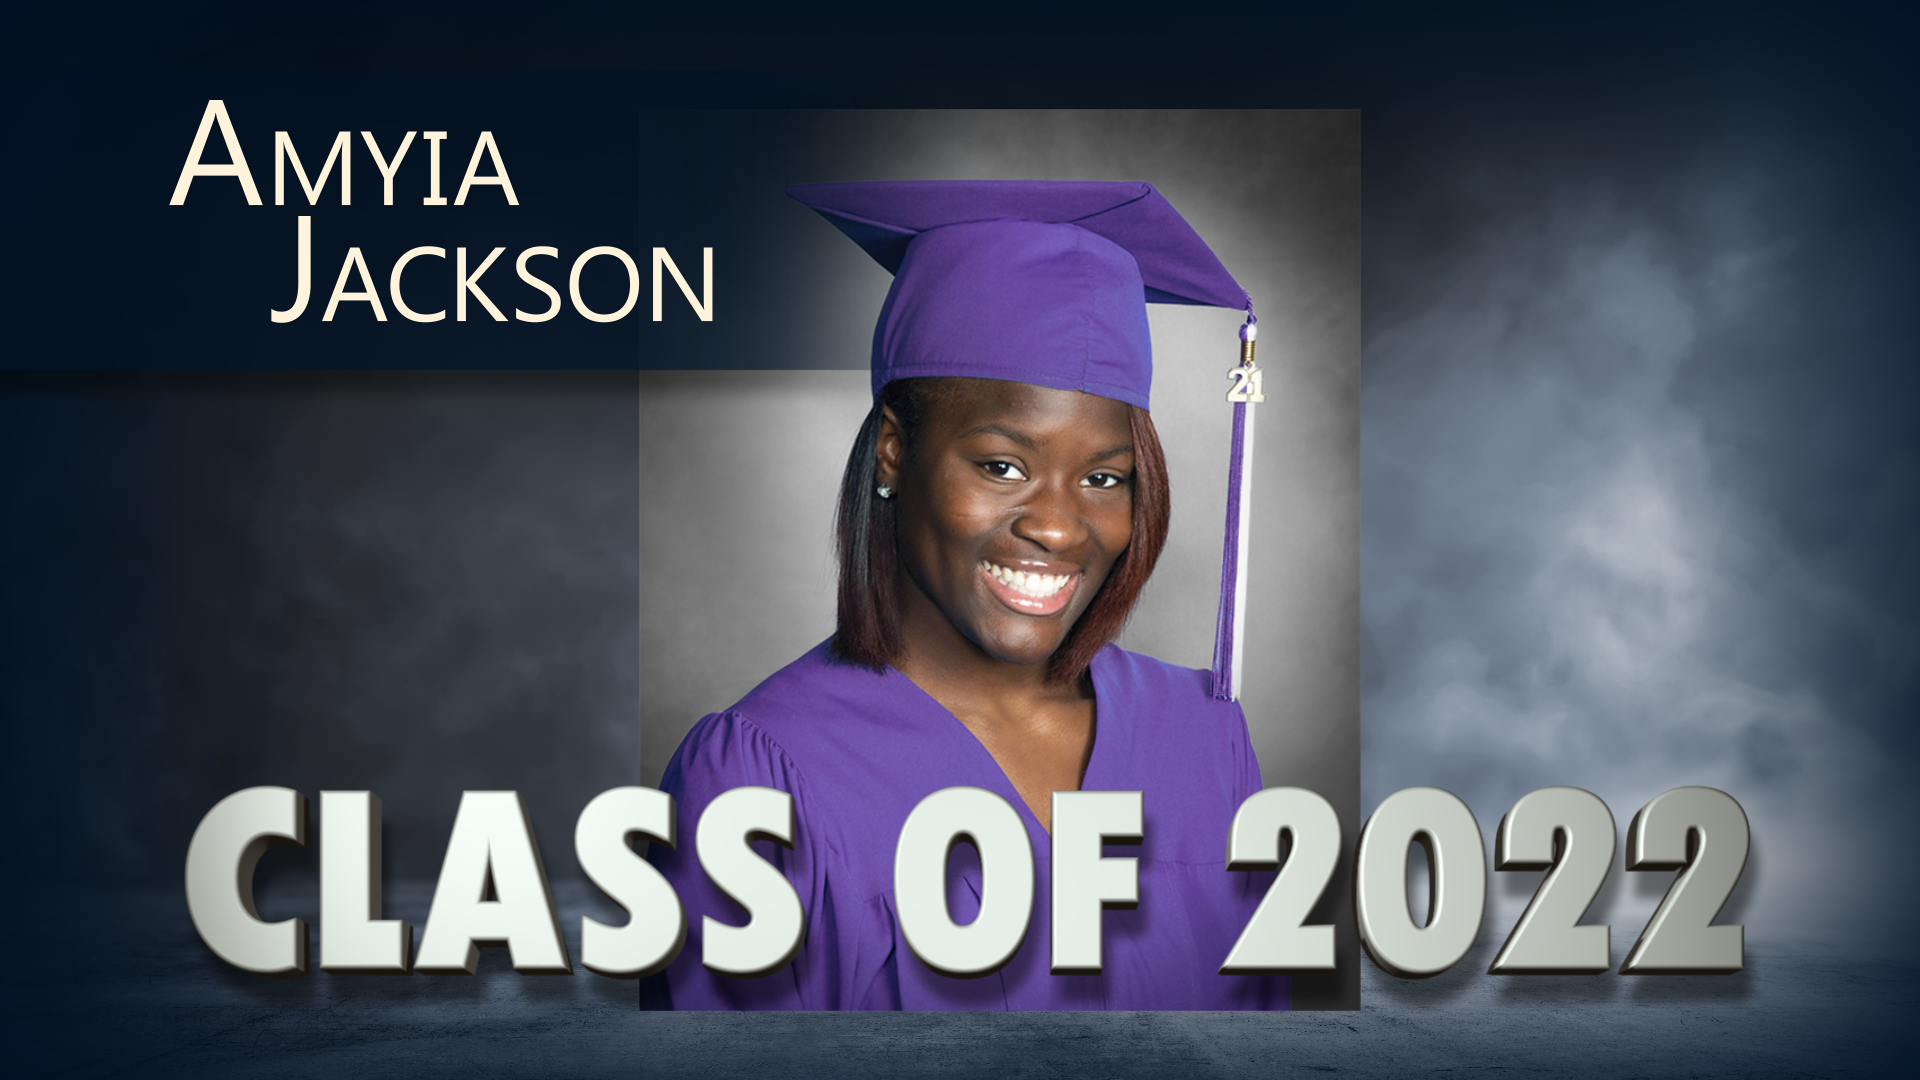
DESIGNING A GRAPHIC FOR EACH STUDENT
Highlight your seniors with professional graphics! Let the Daktronics team lighten your load as you prepare for graduation. We are offering 100 headshots for only $150 to run on your Daktronics digital displays. Our team will populate your headshots into the professional template shown here. All you need to do is provide the names and photos of your graduating seniors.
Place your order no later than seven days before your event and we will take care of the rest! Get started by emailing Entertain@daktronics.com.
Once you’ve got your graphics, you can create a unique button in Show Control to push specific graphics on-cue, or simply create a playlist looping the images.